
AI-powered applications are no longer a luxury. They are a user expectation in 2026. That’s why combining Google’s Gemini AI with Flutter, Google’s cross-platform UI framework, is such a powerful choice for modern app development. Whether you are building your first AI assistant or a production-ready multimodal AI Flutter app, this Gemini API Flutter tutorial provides a practical, code-first approach instead of focusing on theory.
Designed for beginner- to intermediate-level Flutter developers, this Flutter AI integration guide explores two popular approaches: direct integration using the Google Generative AI Flutter package for rapid development, and Firebase AI Logic with Flutter Gemini for secure, scalable production applications.
What Is Gemini AI & Why Use It in Flutter?
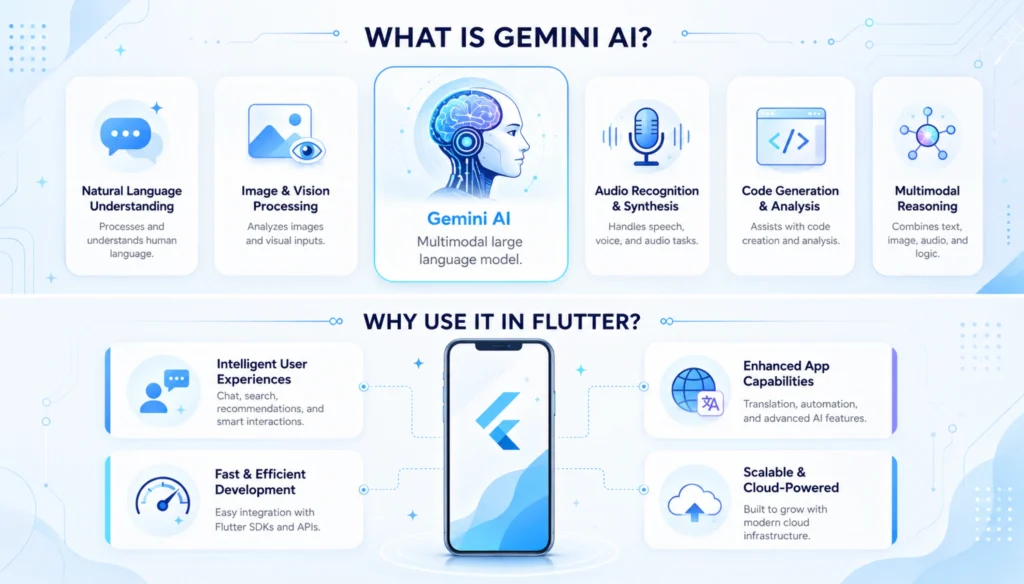
If you want to integrate Gemini AI Flutter applications, you’re leveraging one of Google’s most advanced AI models alongside one of the most popular cross-platform frameworks. Gemini is a multimodal AI model capable of understanding and generating text, images, code, and documents, making it ideal for building intelligent mobile and web experiences from a single Flutter codebase.
Gemini Models
Google currently offers two popular models for developers:
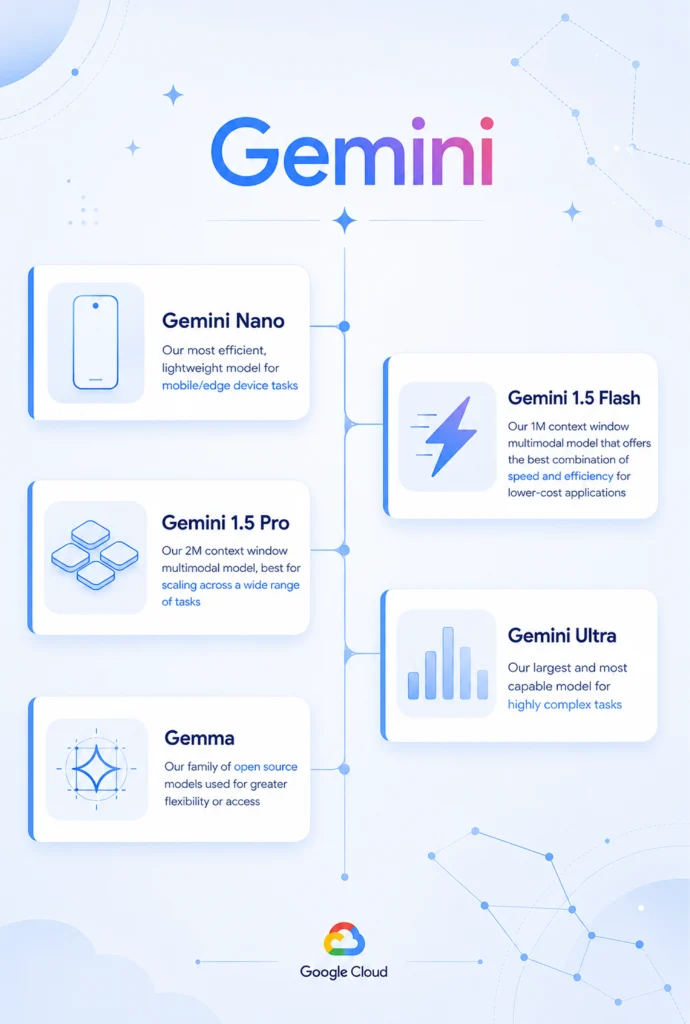
- Gemini 1.5 Flash: Optimized for speed, low latency, and cost-efficient AI features like chatbots and content generation.
- Gemini 1.5 Pro: Designed for advanced reasoning, long-context understanding, and enterprise-grade AI applications.
Whether you’re building a Flutter AI chatbot Gemini solution or a Flutter generative AI app in 2026, you can choose the model that best fits your performance and complexity requirements.
Why Should Flutter Developers Care?
Gemini integrates seamlessly with Flutter through the official Google Generative AI Flutter package, allowing developers to add AI capabilities without building or training machine learning models.
Key capabilities include:
- Native Dart SDK for straightforward integration
- Flutter AI Toolkit for plug-and-play conversational interfaces
- Multi-turn conversations that retain context naturally
- Gemini streaming response, Flutter support for real-time typing effects
- Multimodal AI Flutter app development with text and image inputs
These features make it possible to create smarter, more engaging applications with significantly less development effort.
Two Ways to Integrate Gemini AI Flutter
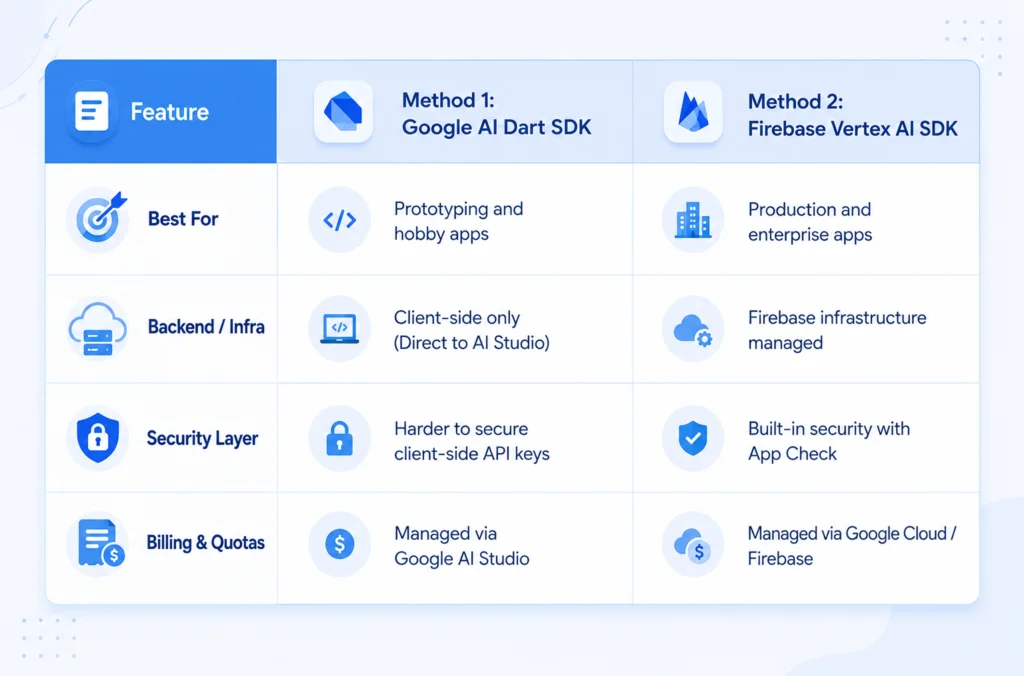
Direct Integration:
Using the google_generative_ai Flutter package is the fastest way to get started. It’s perfect for prototypes, learning, and MVPs, making this Gemini API Flutter tutorial approach ideal for developers exploring AI features.
Firebase AI Logic or Backend Integration
For production applications, Firebase AI Logic Flutter Gemini is the recommended architecture. It keeps API keys secure, enables authentication and rate limiting, and provides a scalable foundation for enterprise AI applications.
Prerequisites & Setup
Before starting this Flutter AI integration guide, ensure you have:
- Flutter SDK 3.27 or later
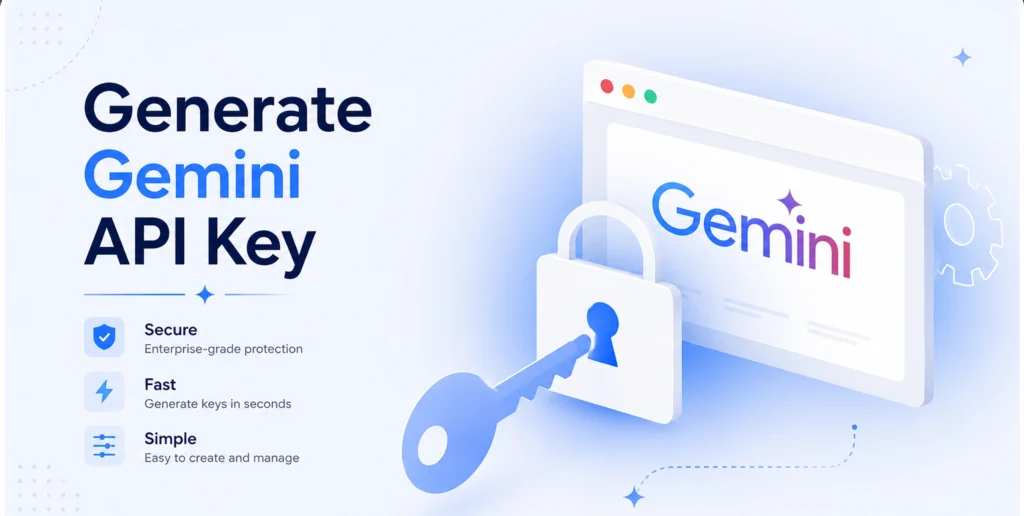
- A Google account with access to Google AI Studio
- A generated Gemini API key
For a secure Gemini API key Flutter setup, store the key in a .env file using the flutter_dotenv package and add .env to .gitignore to prevent accidental exposure.
Production Tip: Environment variables improve development security but do not fully protect API keys in mobile apps. For production, always route Gemini requests through Firebase AI Logic or your own backend server so the API key never reaches the client application.
Adding the Gemini Package to Flutter
Now that your environment is ready, it’s time to integrate Gemini AI Flutter into your project using Google’s official SDK. The google_generative_ai Flutter package provides a clean, native Dart API for accessing Gemini models, while flutter_dotenv helps keep your API key out of the source code.
Step 1: Add Dependencies
Update your pubspec.yaml file with the required packages:
dependencies:
flutter:
sdk: flutter
google_generative_ai: ^0.4.7
flutter_dotenv: ^5.1.0
flutter_markdown: ^0.7.1
Then install the packages:
flutter pub get
This setup forms the foundation of this Gemini API Flutter tutorial and prepares your project for AI-powered features.
Step 2: Load Environment Variables
Create a .env file in the project root and store your Gemini API key securely.
API_KEY=YOUR_GEMINI_API_KEY
Initialize flutter_dotenv before running the application:
import ‘package:flutter_dotenv/flutter_dotenv.dart’;
Future<void> main() async
{
WidgetsFlutterBinding.ensureInitialized();
await dotenv.load(fileName: “.env”);
runApp(const MyApp());
}
This approach provides a cleaner setup for the Gemini API key in Flutter for development while keeping sensitive credentials separate from your application code.
Step 3: Initialize the Gemini Model
Create a reusable model instance using the official google_generative_ai Flutter package.
import ‘package:google_generative_ai/google_generative_ai.dart’;
import ‘package:flutter_dotenv/flutter_dotenv.dart’;
final model = GenerativeModel
(model: ‘gemini-1.5-flash’,
apiKey: dotenv.env[‘API_KEY’]!,
);
For most applications, Gemini 1.5 Flash offers an excellent balance of speed, cost, and responsiveness, making it ideal for chatbots and content generation.
Your First Gemini API Call: Text Generation
With the model initialized, you can generate AI responses in just a few lines of code.
Create a Gemini Service Class
Using a service layer keeps your business logic separate from the UI, making your Flutter AI integration guide easier to maintain and scale.
class GeminiService
{final GenerativeModel model;
GeminiService(this.model);
Future<String?> generateText(String prompt) async {
final response = await model.generateContent([
Content.text(prompt),
]);
return response.text;
}
}
Generate Your First Response
Call the service with a simple prompt:
final response = await model.generateContent([
Content.text(‘Explain quantum computing in simple terms’),
]);
print(response.text);
Within seconds, Gemini returns a natural language explanation that can be displayed directly in your application.
Display the Response in Flutter
For plain text:
Text(response.text ?? “No response available”)
For richer formatting, use flutter_markdown:
MarkdownBody
(data: response.text ?? “”,
)
Rendering Markdown improves readability and is especially useful for AI-generated lists, headings, and code snippets.
Handle Errors Gracefully
AI requests may occasionally fail due to network issues or invalid responses, so always implement basic error handling.
try {
final response = await model.generateContent([
Content.text(prompt),
]);
print(response.text ?? “No response received”);
} catch (e) {
print(“Error: $e”);
}
Checking for null responses and wrapping API calls in try-catch blocks helps create a more reliable user experience.
Quick Win: In fewer than 20 lines of Dart, you’ve built the core of a Flutter generative AI app 2026. This same foundation can be extended into a Flutter AI chatbot, Gemini, a smart content generator, or even a multi-modal AI Flutter app with streaming and image understanding in the next steps.
Building a Multi-Turn Chat (Conversational AI)
One of the biggest advantages of Gemini is its ability to maintain context across multiple messages, making it perfect for creating a Flutter AI chatbot experience. Instead of treating every prompt as a new request, Gemini remembers the conversation and generates more natural, context-aware responses.
Start a Chat Session
Create a chat instance and send user messages:
final chat = model.startChat();
final response = await chat.sendMessage(
Content.text(userMessage),
);
Unlike a simple text generator, this approach enables continuous conversations without manually passing previous prompts every time.
Build a Simple Chat UI
A minimal chat interface requires just a few Flutter widgets:
- ListView.builder for displaying message bubbles
- TextEditingController for capturing user input
- setState() for simple state management (Riverpod or Bloc for production)
- A “Typing…“ indicator while waiting for Gemini’s response
- A List to store conversation history and update the UI dynamically
This architecture forms the foundation of any Flutter generative AI app in 2026, from customer support assistants to productivity tools.
Developer Tip: Google’s Flutter AI Toolkit provides pre-built chat components connected to Gemini, allowing you to create production-ready conversational interfaces with significantly less custom code.
Streaming Responses for a Real-Time Experience
Modern AI applications don’t wait for an entire response before displaying it, they stream content as it’s generated. This makes interactions feel faster and more natural, similar to ChatGPT.
Instead of generateContent(), use generateContentStream():
final stream = model.generateContentStream([
Content.text(prompt),
]);
await for (final chunk in stream) {
setState(() {
output += chunk.text ?? ”;
});
}
Each text chunk updates the UI immediately, creating a smooth typewriter effect.
Best Practices for Streaming
- Update the interface using StreamBuilder or setState()
- Show a loading or typing indicator while streaming
- Append new chunks instead of replacing the entire response
- Wrap streaming calls in try-catch blocks to handle network failures and timeouts gracefully
Implementing Gemini streaming response Flutter functionality significantly improves user experience and makes AI interactions feel more responsive.
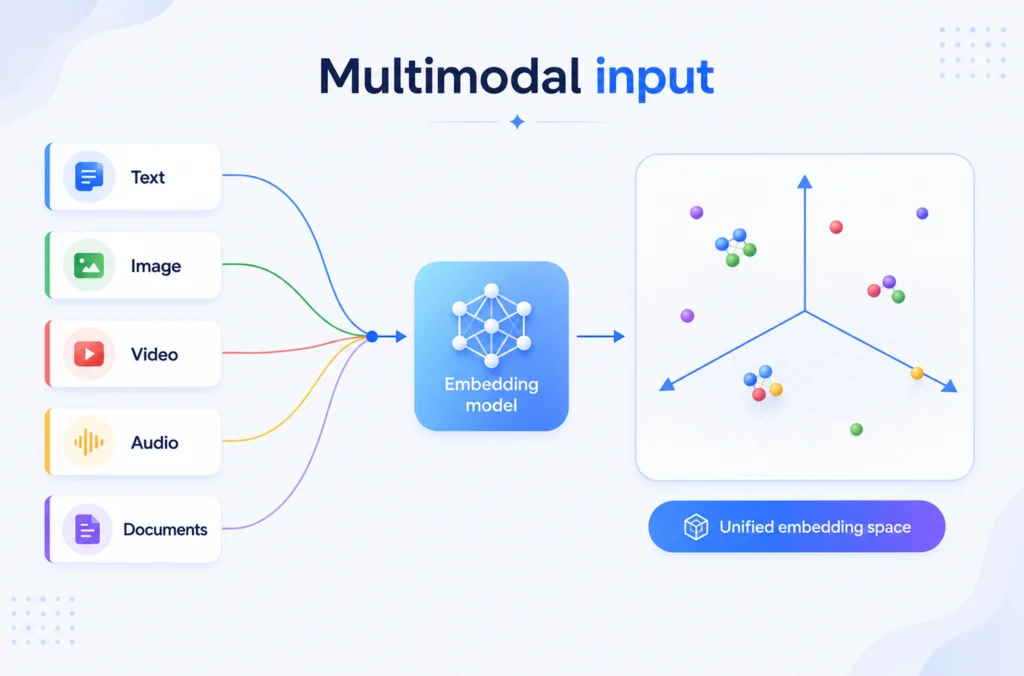
Multimodal Input: Send Images to Gemini
Gemini is designed as a multimodal model, meaning it can understand images and text within the same request. This enables Flutter developers to build AI features that go far beyond traditional chatbots.
Popular Use Cases
- Image description
- Receipt scanner
- Plant identifier
- Food calorie estimator
- Document understanding
Send an Image to Gemini
After selecting an image using the image_picker package, convert it into bytes and include it with a text prompt:
final imageBytes = await imageFile.readAsBytes();
final response = await model.generateContent([
Content.multi([
DataPart(‘image/jpeg’, imageBytes),
TextPart(‘What is in this image?’),
])
]);
Gemini processes both inputs together and returns a context-aware response that can be displayed using a simple Text widget or MarkdownBody.
Why Multimodal Matters?
Adding image understanding transforms a standard AI assistant into a multimodal AI Flutter app capable of solving real-world problems, from identifying products and scanning receipts to explaining diagrams and generating image captions.
Quick Win: In roughly 15 lines of Dart, you’ve built the core of a multimodal AI feature. Combined with conversational chat and streaming responses, you now have the building blocks to integrate Gemini AI Flutter applications that deliver fast, interactive, and intelligent user experiences across mobile, web, and desktop platforms.
Production Security: Protecting Your Gemini API Key
While it’s easy to integrate Gemini AI Flutter applications by calling the API directly from the client, doing so in a production environment can expose your API key and leave your application vulnerable to misuse. A secure architecture not only protects your credentials but also enables authentication, rate limiting, and usage monitoring.
Development vs. Production
During local development or prototyping, storing your key in a .env file with flutter_dotenv is a practical approach.
Flutter App
↓
flutter_dotenv
↓
Gemini API
This setup works well for learning and quick MVPs, but should never be considered a production security solution, as mobile apps can be reverse-engineered.
Production Approach: Route Requests Through a Backend
For a scalable Flutter AI integration guide, all Gemini requests should pass through a secure backend where the API key remains hidden from the client.
Flutter App
↓
Secure Backend
↓
Gemini API
This architecture protects sensitive credentials while giving you complete control over authentication, logging, and request validation.
Option A: Firebase AI Logic + Genkit (Recommended)
Google recommends using Firebase AI Logic Flutter Gemini for production applications.
The setup is straightforward:
- Configure Firebase using FlutterFire configure
- Initialize Firebase in your Flutter project
- Use FirebaseAI instead of GenerativeModel
- Route all AI requests through Firebase services
With this approach, the Gemini API key stays on the server and is never exposed to the client application, making it ideal for enterprise and consumer apps.
Option B: Build Your Own Backend
If you need greater flexibility, create a backend using:
- Node.js + Express
- Python + FastAPI
- Cloud Run or Cloud Functions
Your Flutter application communicates only with your API, while the backend securely interacts with Gemini. This approach works equally well for a Flutter AI chatbot, Gemini, a multimodal AI Flutter app, or any Flutter generative AI app in 2026 requiring custom business logic.
Gemini Production Security Checklist
Before deploying your application, make sure you can check every box below:
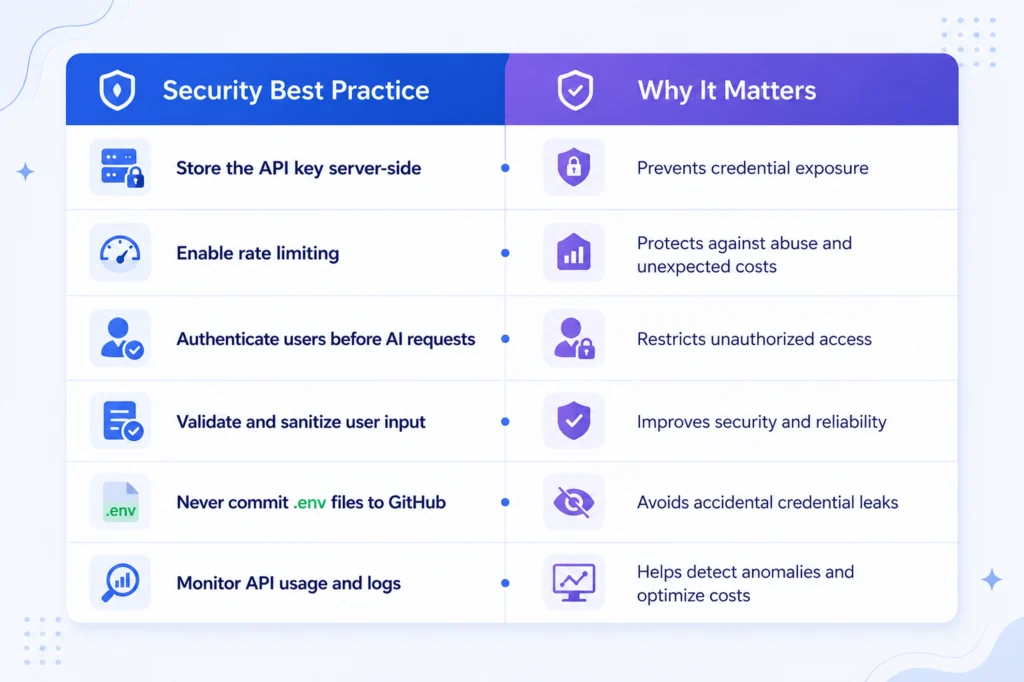
Best Practice: Whether you’re following a Gemini API Flutter tutorial for a simple prototype or building a production-scale AI platform, treat the API key like a password. Environment variables (flutter_dotenv) are suitable for development, but a secure backend powered by Firebase AI Logic, Flutter Gemini, or your own server is the recommended approach for shipping reliable and secure AI-powered Flutter applications.
Real-World Use Cases You Can Build with Gemini & Flutter
After you integrate Gemini AI Flutter into your project, you can quickly add intelligent features that improve user experience without building custom AI models. Using the google_generative_ai Flutter package, you can create everything from conversational assistants to multimodal applications such as an AI chatbot, an image analyzer, a smart search feature, a content summarizer, a code explainer, a recipe generator, etc.
Let’s review the most practical side of the use cases:
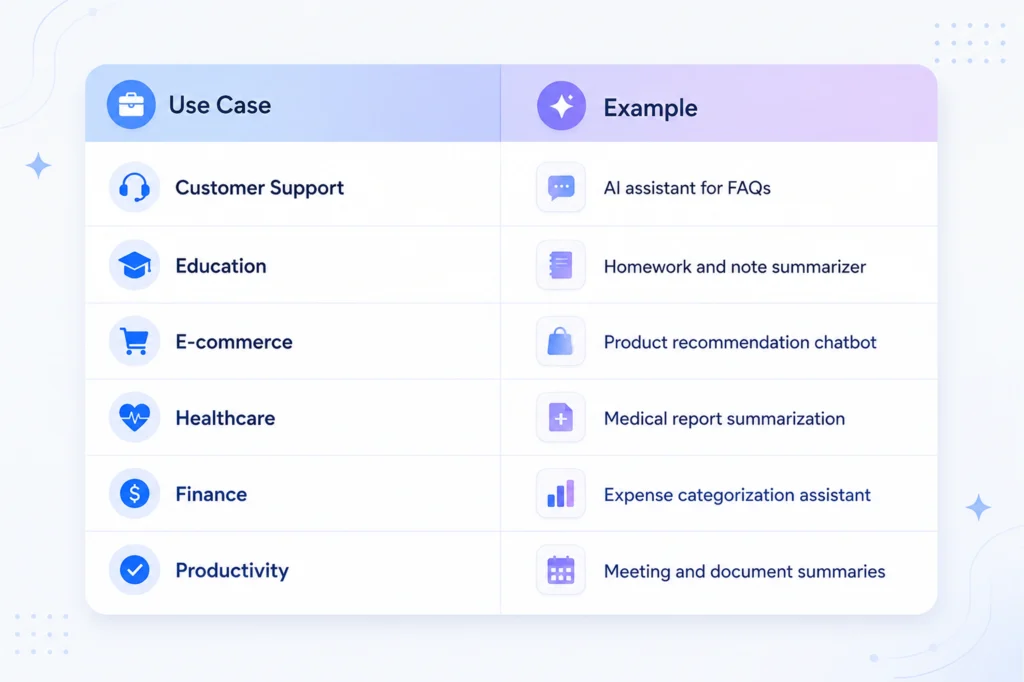
Quick Take: Whether you’re following a Gemini API Flutter tutorial or building a Flutter generative AI app in 2026, combining Gemini streaming response Flutter capabilities with Firebase AI Logic Flutter Gemini creates secure, intelligent, and engaging cross-platform applications.
Common Mistakes When Integrating Gemini in Flutter
- Exposing API keys in client apps
- Forgetting to handle null responses
- Sending every request as a new conversation instead of using chat sessions
- Ignoring rate limits and token usage
- Rendering AI Markdown as plain text
- Not validating user input before sending it to Gemini
Conclusion
Knowing how to integrate Gemini AI Flutter applications gives developers a fast and scalable way to add intelligent features to cross-platform apps. From Gemini API key Flutter setup and text generation to conversational chat, Gemini streaming response Flutter, multimodal inputs, and production security, you now have the building blocks to create modern AI experiences.
With the official google_generative_ai Flutter package and Firebase AI Logic Flutter Gemini, you can build everything from a Flutter AI chatbot Gemini to a multimodal AI Flutter app using a single Flutter codebase.
What’s Next?
- Explore Flutter AI Toolkit for pre-built chat UI components.
- Try Genkit Dart for secure server-side AI workflows.
- Upgrade to Gemini 1.5 Pro for advanced reasoning and complex AI use cases.
This Flutter AI integration guide is a solid starting point for building the next generation of Flutter generative AI apps in 2026 projects with speed, security, and scalability.